Why Farm Worms?
Compost is an essential resource in any garden. Even in a small space, container gardening will be easier when you can create at least some of your own growing medium. In larger gardens, compost is a necessity. It can help you make sure that your soil remains healthy and capable of providing high yields. Fortunately, you can create compost even in the smallest of spaces.
A worm farm is a great way to create compost and worm farms come in all sizes. Worms can help you to break down kitchen waste into a great soil-enriching material, full of nutrients that will help your plants to grow.
Inputs And Resources Required For Worm Farming
Fortunately, getting started with worm farming, or vermiculture*, is easier and cheaper than you might imagine. The financial outlay will be small and for only a small investment in time, you will get an increased yield from your garden and will save some of your kitchen waste from heading to landfill. If you eat and cook with fresh fruit and vegetables this will be a considerable amount of waste, if you live buy your food ready made, it will naturally be less.
All you need to get started is a container for your worms to live in, cardboard and vegetable scraps from your kitchen. Once you set up a worm farm correctly, the worms will largely take care of themselves. If you provide your worms with the right environment you can leave them to their own devices for a week or two while you go on holiday and will only have spend a little time on continued upkeep.
Creating or Purchasing Your Worm Farm
The first thing to think about is the container that will hold your worms and composting materials. There are plenty of affordable worm farms on the market, though to save money you could also consider creating your own. Worm farm containers come in many different sizes. How big your container should be will depend on how much food waste you create each week. As a general rule of thumb, it is suggested that for each pound of food waste you generate per day (on average) you will need around 1 square foot of worm bin surface. (Mary Appelhof, ‘Worms Eat My Garbage’). How deep the bin should be will largely depend on how much worm casting compost you wish to create. Some people choose a container with multiple trays or vertically separated compartments, while the simplest models have simply one large space for the worms. The materials used often depend on what an individual has to hand.
Some councils encourage the keeping of worm farms and make them available at a reduced cost or even free of charge. (City of Sydney Council and Byron Bay Council in Australia both offer worm farms at a very competitive rate).
You can also seek out a specialist who assists with the equipment, setting up and maintenance of the worm farm. Here in Byron Bay we are lucky to have Compost Central, established by Andrew Hayim De Vries who offers all of these services and expertise.
One example of a simple home-made worm farm:
Essential Features For Your Worm Farm
A worm farm must allow your worms to breathe and so, obviously, cannot be air tight. It must be a cool space which will not heat up too much and yet which will provide worms with a certain amount of protection against the cold. The worms dislike light and so the container should exclude as much light as possible. While not absolutely essential, many worm farms have a separated reservoir at the base to contain excess moisture and prevent the worms from drowning and a tap to drain off that liquid. (The liquid can then be used as a general purpose plant feed.)
Where To Site Your Worm Farm
A worm farm can be kept indoors or outdoors, though the key is to choose a site where the temperature will not fluctuate too wildly. Worms will perform best at temperatures between 10 and 25 degrees Celsius though the most commonly used species can survive between zero and 35 degrees. Exactly where you place your worm farm will depend on the space you have at your disposal and the climatic conditions where you live. If kept correctly, your worm farm will be a self-contained unit and will not create unpleasant smells. It is a good idea to keep it close to, though not in, your kitchen. This will make it easier and quicker to feed the farm with food scraps.
Preparing A Bed For Your Worms
Before getting your worms you will have to create a bed for them in the container you are using for the worm farm. Layers of torn up cardboard or shredded paper will be perfect for this purpose. Worms will sleep between the layers of cardboard or paper. When awake, they will then venture into through into the food scrap layers, eating their fill and excreting the worm castings that will form the basis of the compost that you will create. This bedding should be wet to create the right levels of moisture that will allow your worms to survive. Adding a small amount of compost will help worms to acclimatise to their new home.
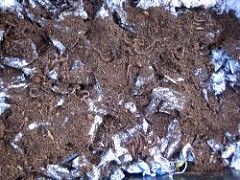
Worms in their new home. They will soon burrow down to escape the light.

What Kind of Worms To Use In Your Worm Farm
The worms in your worm farm are not the same kind of worms that you will find in the soil of your garden. The specialist composting worms most commonly used are Eisenia fetida, Eisenia andrei or Eisenia hortensis. In hotter climates, there are some other worm species that are better equipped to handle the tropical temperatures. Vermiculture experts will be able to advise you on the best species to use where you live. Worms in the right conditions will breed quickly. For the average household, starting off with 1 pound (just under ½ kg) of worms will usually allow the population to breed and quickly meet demand, though of course you can always start smaller and build your way up. A single person or couple may only require around half this quantity.
Sourcing Worms For Your Worm Farm
In Australia, you can easily find and order worms for your worm bin online. In certain areas you may also be able to find local suppliers. There are a number of companies who will post worms to anywhere in Australia.
Feeding Your Worms
Worms will eat kitchen vegetable scraps commensurate with their own body weight each day! If you have 1/2 kg of worms then, you will be able to deal with 1/2 kg of waste each day. Of course the amount of kitchen waste that you can feed to your worms will increase as the population of your worm farm grows. When adding food for your worms it is best to start slow and then gradually increase the amount. To begin with, add just ½ a pound of scraps every second day. Keep looking inside your bin every day at first. If it starts to smell – you have overfed the worms. Simply stop adding food until the smell goes away. Feeding little and often is better than adding large quantities of food waste in one go. When adding food, always make sure you add it beneath some cardboard or paper bedding. Worms will sleep at the top of the pile and delve below to eat. Burying the food waste will also lessen the likelihood of fruit fly problems. Here is a list of 101 things to feed your worms.
Moisture Management In Your Worm Farm
Worms need a high water content to live. They breathe through their skin and can do so most effectively when their skin is moist. They will thrive when the moisture level around them is at around 75%. When keeping worms for composting it is important to stop the worm farm from becoming waterlogged or drying out. It is usually a good idea to dampen the bedding, unless the scraps you have added have a very high moisture content. A container with a reservoir at the base and a tap to drain off excess liquid will make it easier to ensure the moisture content of the container is not too high.
No-Nos For Your Worm Farm
Composting worms are not hugely fussy when it comes to what they will eat but there are still certain things that you should not add to your worm farm. Unless they have already been fully fermented using a Bokashi bucket, it is best not to add any meat or dairy products as these can harbour harmful bacteria. You should also avoid disturbing the pH balance of the bin by adding too many citrus rinds. Worms will usually steer clear of anything too acidic. They may also dislike strongly spicy foods. You should not add too much grass or any other green material too high in nitrogen as this can raise the temperature of the bin too much and make a hostile environment for the worms. It is a good idea to chop anything too large into smaller chunks to speed up the composting process.
Harvesting Your Vermiculture Compost
If you are monitoring your bin and adding food scraps regularly then you will be able to see when you have a good quantity of compost to harvest and use. The food scraps will be virtually unrecognisable and the resulting material will be brown, crumbly and moist, without any unpleasant odour. There are several different methods for extricating the compost without sending the composting worms out to die in your garden. The simplest is to add food scraps and bedding to only one side of the bin. You can then dig out the compost from the other side. Worms will move to where the food source is to be found, usually within a couple of weeks in an average sized bin. In containers with multiple trays, worms can be encouraged to move vertically, to a new tray with bedding and food, leaving lower trays with worm-free vermicompost and worm castings. You can then use the valuable, rich compost as a medium for seed sowing or planting, or simply spread it on your beds and borders to enrich your soil.
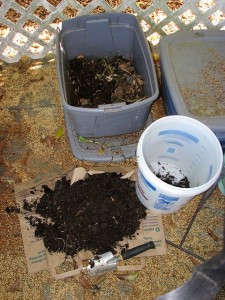
The photo shows a harvest of ‘black gold’ – quality vermicompost
* Vermiculture is the process of using worms to decompose organic food waste, turning the waste into a nutrient-rich material capable of supplying necessary nutrients to help sustain plant growth. This method is simple, effective, convenient, and noiseless. It saves water, energy, landfills, and helps rebuild the soil.
Other resources:
If you are based in Australia and wish to set up a worm farm, check the worm lovers out!


